Mouse Properties
A mouse is a device that allows the user to position a pointer on the screen. A mouse has the following properties:
- The mouse pointer can be positioned anywhere on the physical screen. (Note that this can include regions outside of your application window in a graphical environment.)
- Under graphical environments, the mouse pointer can have a variety of shapes. The default shape is typically an arrow. On character-based systems, the mouse pointer is a square in reverse-video.
- The mouse itself has from one to three buttons on it. These buttons may be either "up" or "down." We say that a mouse button has been "clicked" if it has been pushed down and then quickly released. Also, a button may be "double-clicked" (clicked twice in quick succession). (Note that "up" and "down" are states; "clicking" and "double-clicking" are transient actions.)
- The buttons are referred to as the "left," "right," and "middle" buttons. A mouse with two buttons has only "left" and "right" buttons; a one-button mouse has only a "left" button. Left-handed users typically exchange the meanings of the left and right buttons, but this is handled outside of the application--your program refers to the primary mouse button as the "left" button regardless of the actual button used.
- Some mouses, in addition to the buttons, have a wheel. The mouse wheel can be used to scroll a window, just like a scroll bar. In the Windows environment, in the Mouse Properties applet of the Control Panel, the user can configure mouse wheel action so that each click (or notch) of the mouse wheel is equivalent to a certain number of mouse button clicks on the scroll bar.
- The mouse pointer is independent from the program's text cursor. Typically, an application lets the user position the text cursor on the screen by positioning the mouse pointer at the desired location and clicking the left button.
System Date and Time
Computers connected to the internet should automatically adjust for daylight savings time.
Right-click on the time in the bottom-right of the screen and select Adjust Date/Time.

A window will open. On the left side of the window select the Date & time tab. Then, under "Change date and time" click Change

Note: Both Set time automatically and Set time zone automatically must be Off to make this change.
Enter the time and press Change

- The system time has been updated.
Display Properties
View display settings in Windows 10
Most of the advanced display settings from previous versions of Windows are now available on the Display settings page.
Select Start > Settings > System > Display.
1. If you want to change the size of your text and apps, choose an option from the drop-down menu under Scale and layout. Learn how to change just your text size in Make Windows easier to see.
2. To change your screen resolution, use the drop-down menu under Display resolution. Note: You should use the Recommended resolution. If you change the resolution, content might appear blurry or pixelated.
3. To adjust your color calibration, search "calibrate display color" in the Settings search box and follow the directions.
4. If you don't see a setting you're looking for, try searching for it in the search box on the taskbar.
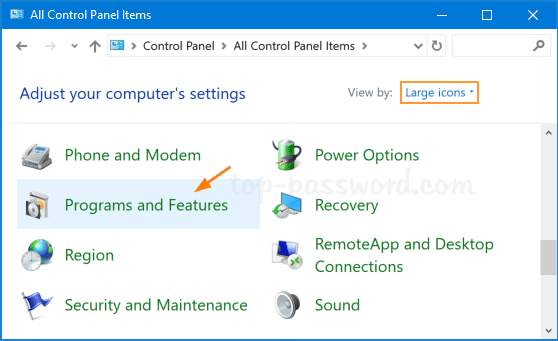
If you want to get installed programs list or uninstall an application, you have to access the Programs and Features panel. In this tutorial we’ll show you different ways to quickly open Programs and Features in Windows 10.
Method 1: Open Programs and Features from Control Panel
Launch the Control Panel and set the display to Large icons, then click Programs and Features.
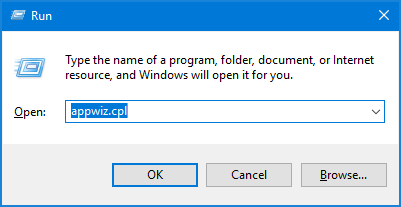
Method 2: Open Programs and Features via Run
Press Windows + R keys simultaneously to launch the Run box. Type appwiz.cpl and click OK to open Programs and Features.
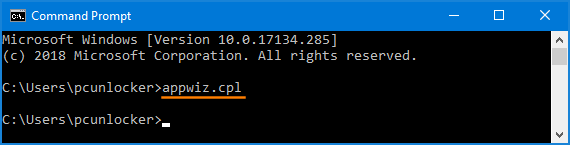
Method 3: Open Programs and Features from Command Prompt
If you’re running a Command Prompt or PowerShell, just execute the appwiz.cpl command. This will get you the Programs and Features window.
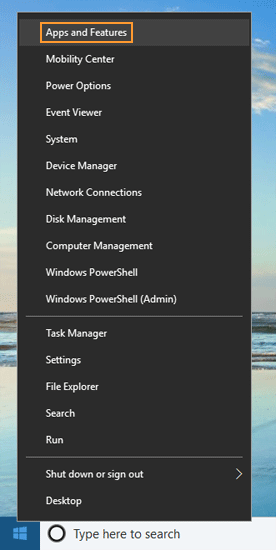
Method 4: Open Programs and Features from Win+X Menu
Right-click on the Start button or press the Windows key + X keyboard combination. When the WinX menu opens, select Apps and Features.
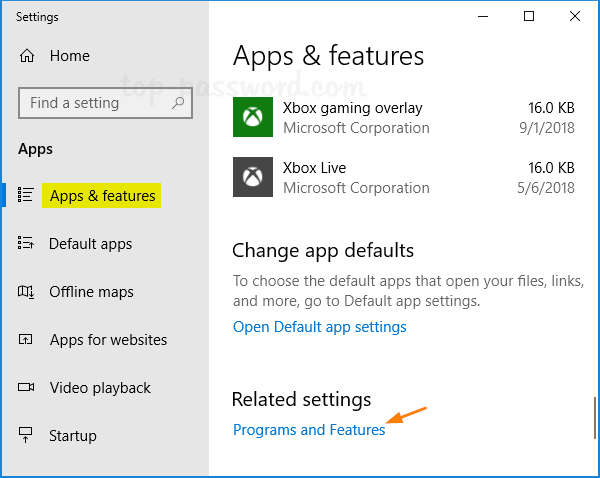
This will open the Apps & Features pane in the new Settings app. On the right panel, look for the “Related settings” section and you can click the “Programs and Features” link to access the traditional Uninstall Programs window.
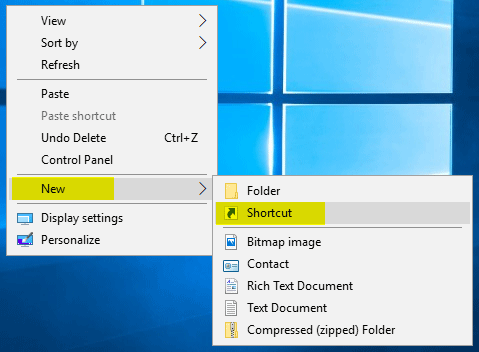
Method 5: Create a Programs and Features Shortcut on the Desktop
If you want to open Programs and Features with just a single click, follow these steps to create a desktop shortcut for quick access:
- Right-click any vacant area in the desktop, and select New -> Shortcut.
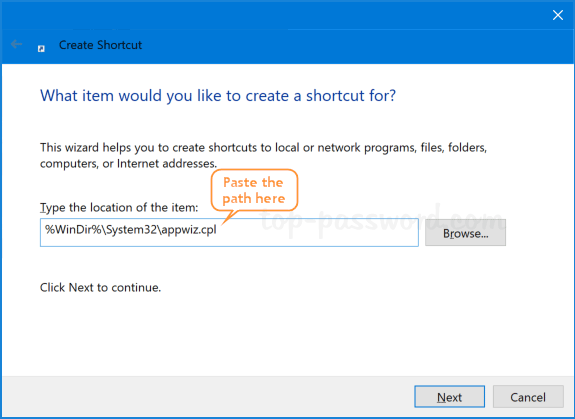
- Copy-paste the following command into the “Type the location of the item” field, and click Next.%WinDir%\System32\appwiz.cpl
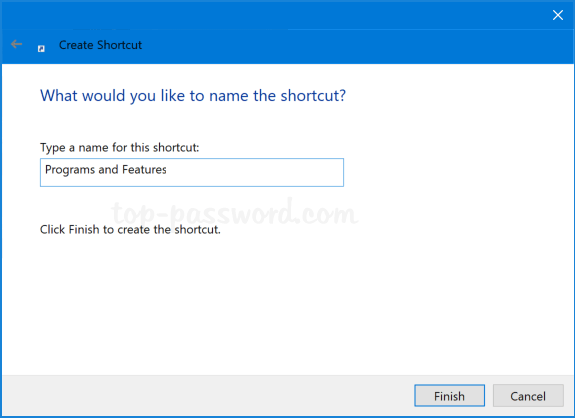
- Name the shortcut “Programs and Features” or whatever you like, and then click Finish.
- Now, you can double-click the new shortcut on your desktop to access Programs and Features easily, or assign a keyboard shortcut to launch it.
Sharing Printers over the Network in Windows 10
Before you can share a printer, it must first be set up, connected and powered on. Click Start > Settings > Devices, then open the Devices and Printers link. Right-click your printer, then click Printer properties.
Click Start > Settings > Devices, then open the Devices and Printers link. Right-click your printer, then click Printer properties.

Select the Sharing tab then check the box to share your printer.
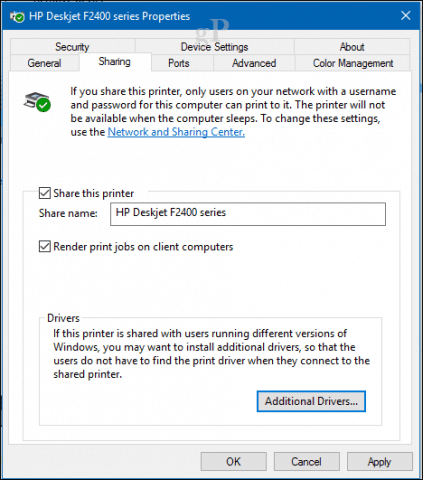
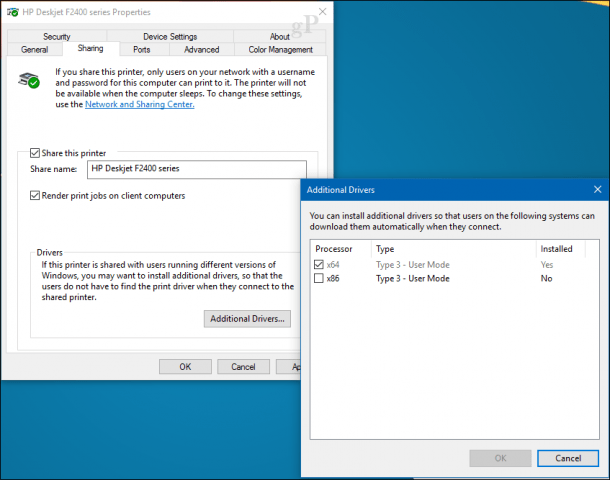
Users should take into account, if you are sharing a printer with multiple devices running a mixture of Windows client architectures – 32 or 64 bit -, you should enable the “Render print jobs on client computers” option. This will ensure other users can easily install the printer when connecting over the network.
Connect to a Windows 10 Shared Printer
After setting up your shared printer, you can connect to it multiple ways. The first method is from within Devices and Printer. Click the Add Printer button, then click the link, The printer that I want isn’t listed. Choose the Select a shared printer by name radio box then browse to the printer on your network then click open.

You will be prompted to install the driver. Click Next to complete the installation of the printer.

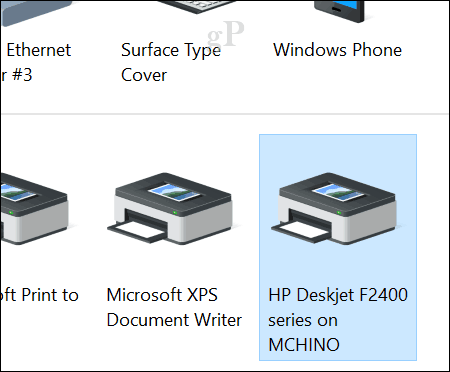
That’s it! The printer will now show up in Devices and printers as a local device.
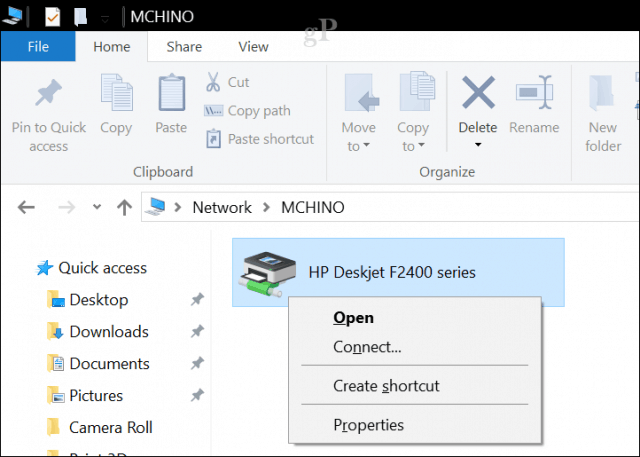
Another way you can connect to a shared network printer is from within File Explorer. Open the Network folder, browse the computer containing the shared printer, right-click it then click Connect.
Extensions for Windows File Explorer to Manage your Files
1. Mountain Duck
Mountain Duck is a handy app that allows you to mount both server and cloud storage as local volumes in File Explorer. It is useful if you need to manage several different cloud storage services at once because switching between different interfaces can slow you down while you are working.

2. TeraCopy
Moving large files from one folder to another can be time-consuming and prone to errors. TeraCopy is a utility app for moving and copying files, using dynamic buffer adjustments in the copying process. It creates pending queues with multiple file operations and executes them at the same time. If an error occurs, TeraCopy will skip only the corrupted file instead of terminating the entire transfer process.


0 Comments